

I am sorry I promised this post last week and between birthdays and the flu- Life happened!!
This post I write because it is one of the top email questions I get all the time!! It started when I posted a picture on facebook of this custom table I did for a client. And I did a couple more just like it from that little picture!! 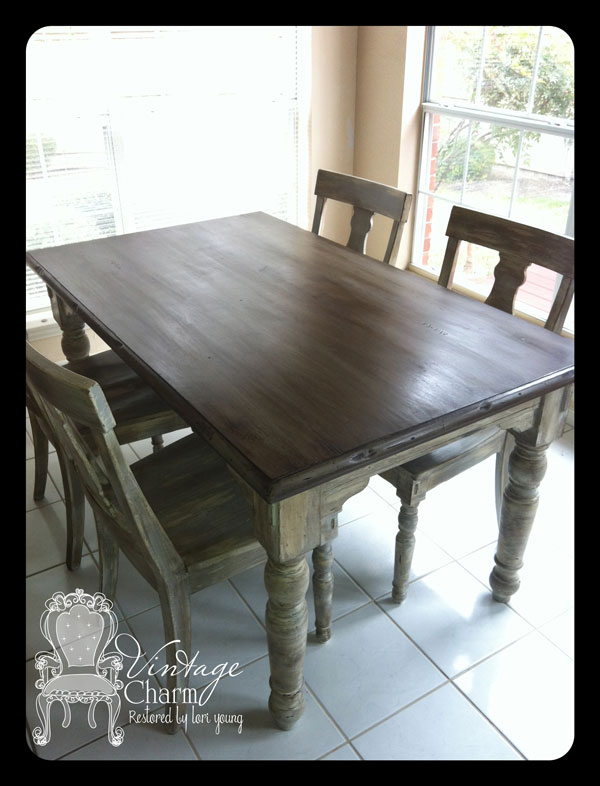 Now this look may not be for everyone but it was exactly what the client was looking for. Heavily distressed but- more of a distressed look from all the paint layers, wax, and such. Her table was quite new and from a big brand company we all love but the top was flaking off. She wanted it to look old and aged. Wanted a stained top but not solid. So with lots of tries and working through different techniques this is what we came up with!! And when she LOVED it- I was so thrilled!! It is labor intensive to say the least to do all the chairs and legs like this but the top- well that’s easy and I will tell you how!!
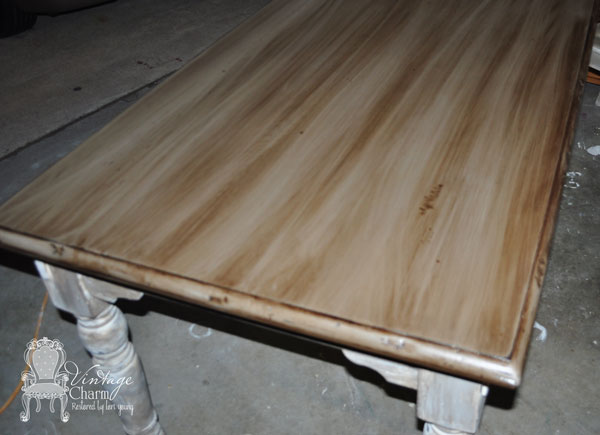
At the time I was using Annie Sloan’s Chateau Grey as the base and I used Minwax Dark Walnut for the stain. Below is the table with one coat of stain lightly washed on.
On this top I let the first coat of wax thoroughly dry. The second coat of wax was almost dry when I then applied dark wax- this drug a bit off allowing some of the paint to show through. I applied 2 coats of dark wax and one clear wax coat. Allowing each coat to completely dry- this took a week all by itself.
I did another table much the same. It was a great little table set that just needed new life!! You know the light maple with hunter green accents… Well bye bye 80’s!!
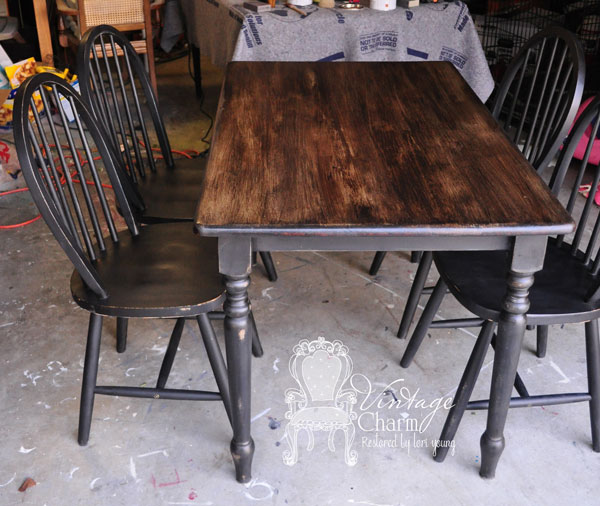
When doing this set I originally planned to just stain over the sanded down table top but it didn’t have the depth that the client was looking for. So we sanded down the stain and painted it with Annie Sloan Coco and applied Minwax Jacobean to the top.

and then we beat it up a bit to make it not so perfect. Sanded in some places allowing the dark stain from below the chalk paint to show through in spots and it really developed a layered rustic look.

For this one Because the stain was so dark and the layers were perfect I used wipe on poly only. With Annie Sloan’s wax you cannot apply an extra protectant to the top or you will have it “sitting” on you wax. You have to use a penetrating wax if you want to apply an extra protectant to it. This family uses this table everyday. And where they want the distressed look they don’t want it scratching and failing on them sooner than they need!! So it has been protected with a couple of coats of Minwax Wipe on Poly.
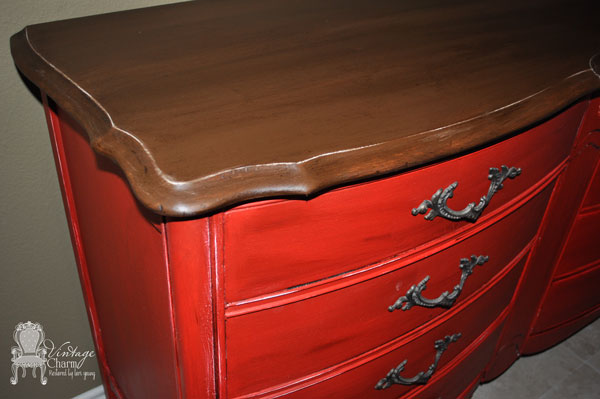
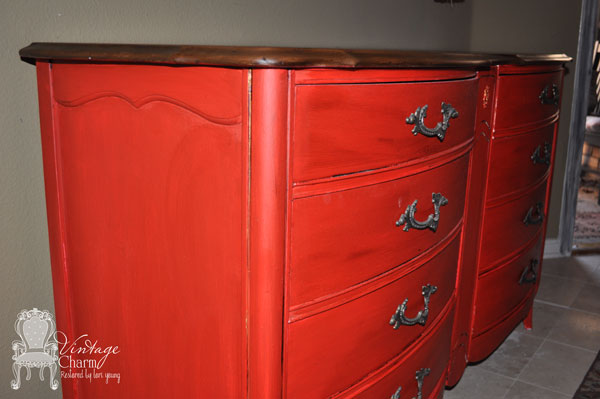
Which then leads me to the latest project where everyone wanted to know if it was stained or painted… Well both!!
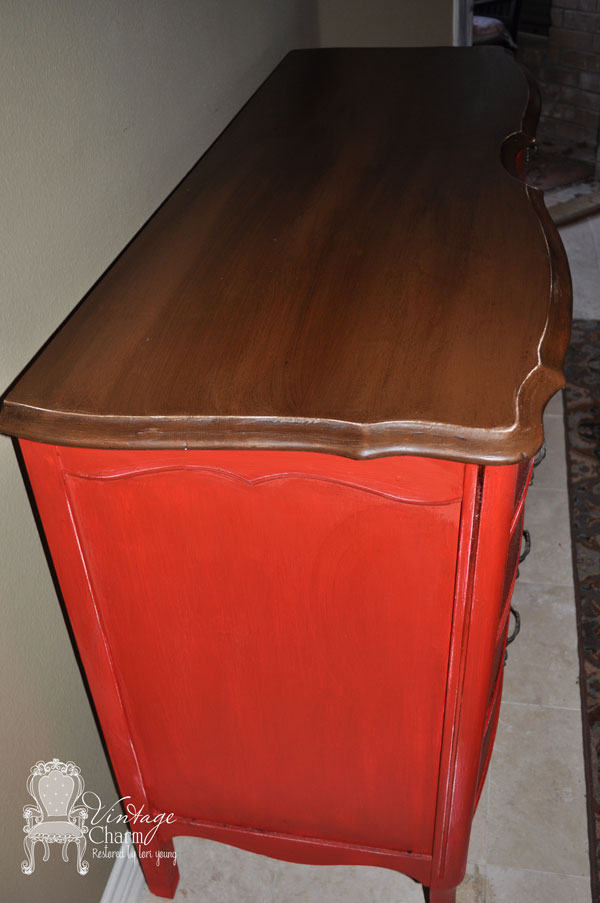 But not as heavily as the others. I loved the color of the new Le Craie Chocolat.
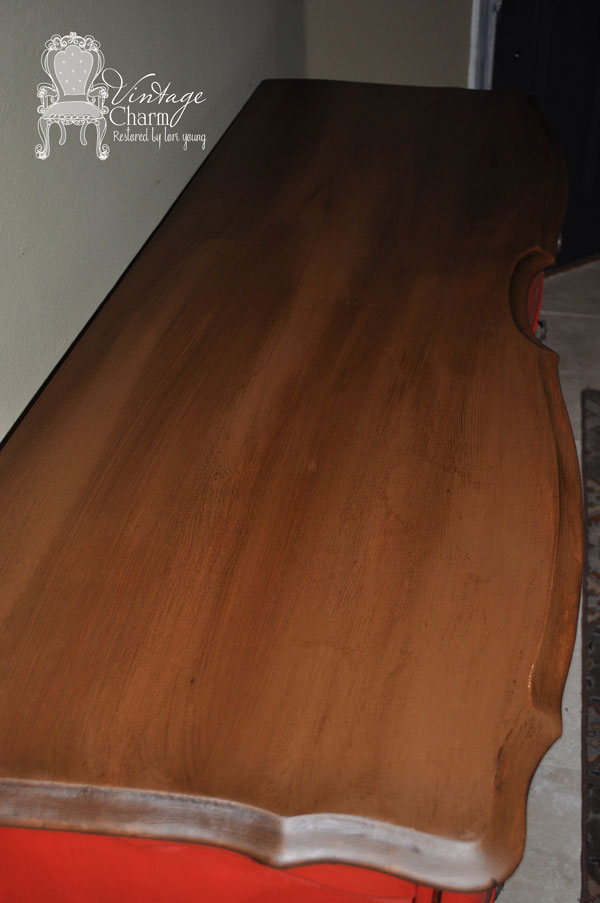
I also wanted to show you that you truly want to correct any damage you might have in a piece because with stain even when using a chalk-based paint below you will see the imperfections slightly more!!
So with this piece I painted only one coat and stained and found myself with my sander correcting the spots that I didn’t when I had originally painted it with latex a year back… {I know, I know… but it’s mine and I didn’t have the time}
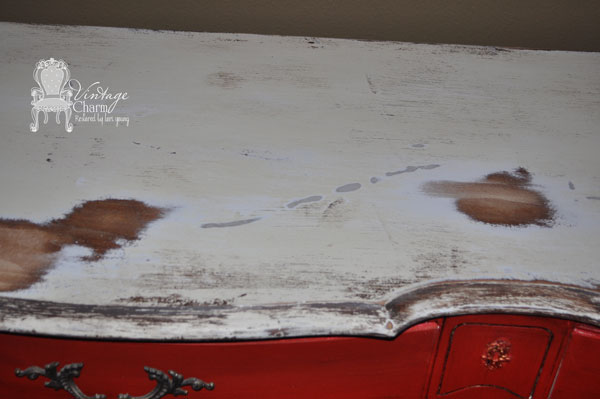 See- I sanded it all down nice and smooth and it’s all better!! Take the time to do it right the first time… is what I need to listen to even when it’s for me!!
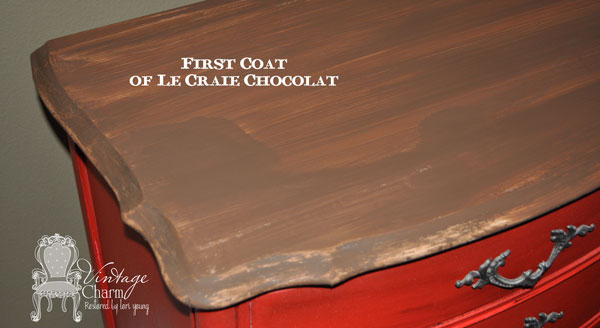 Now on this one I did 2 coats of the Le Craie Chocolat. It’s like Hershey’s chocolate {I promise I didn’t taste it to see!! } I applied 2 coats of our Antiquing Dark Wax after the stain was completely dry, okay it was almost dry!! No extra protectant on this one but if you have heavy usage you can absolutely apply a wipe on poly over our wax!! It’s penetrating and it dries in 20 minutes or less!! LOVE this wax!!!
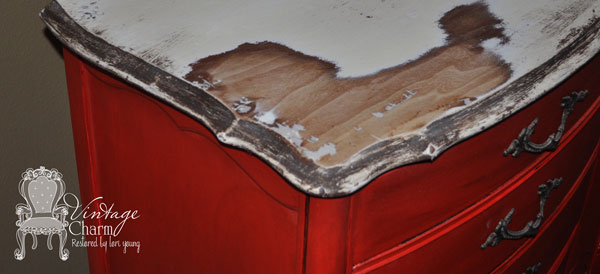
 And there she is all finshed up. I distressed the edges just a bit to let the cream come through.
Thank you for stopping in!! I hope that you will come back soon and leave a comment if you have any questions!!


Love the look! Just want to clarify the steps using La Craie wax.
1-sand and prep. 2- chalk paint. 3-stain using what ever color minwax over dry chalk paint to your desired look.
4-wax (i love ma craie-my favorite). 5- wipe on a few coats of poly.(after wax dries)
AS wax does not allow a wipe on poly after waxing for durability but La Craie does???
I find La craie easier to work than AS and so glad that you can achieve a rich textured vintage look in 1/2 the time!
Susan, you have it all right!! Just make sure to allow each coat of wax and each coat of poly dry in between before applying the next. And no you can’t use it on top of AS it will just “sit” and eventually fail. The Le Craie wax actually penetrates into the paint and piece to provide it’s protectant. This is why you don’t have that waxy feeling when you touch a piece- smooth yes but not a coated feeling. That took me some time to get used to but I love it!! I am so glad you love your wax!! Let me know if you need anything else!! ~ Lori
Lori do you put the stain on full strength or mix with water?
Thanks for sharing all these awesome techniques. I love playing around 🙂 I’ve been mixing my own glazes too. Have a great day,
Debbie
You are sweet Debbie!! I love playing and mixing around with the waxes and glazes!! ~ Lori
Lori….wow what a transformation! What kind of paint is it you use? I love that dresser. I used ASCP and the waxes….still am a little scared of the dark wax. Love your site and am your newest follower on fb.
Kelly
Kelly, Thank you for following me here and fb!! I use mostly all Le Craie paint and waxes. The wax is by far the easiest to use. Smooth like butter and still has the protection needed!! Our dark wax can applied right to the paint and will not “bite” like the AS. You’ll never use anything else once you try it!! 🙂 Have a great day and thanks again for the comment!!
That is amazing!!! Thank you so much for such a great tutorial!! I have been wanting to do my dinette set but, want it to have that farmhouse look on the top. Now I know how 🙂
Dawn, you are so sweet!! Thank you for leaving such kind words!! If I can be of any help to you when you start just send me an email or call!! ~ Lori
How do I get in touch? Your work is awesome
You can email me at vintagecharmrestored@live.com
Thank you. Sorry for late reply.
Hi thanks for the examples. I have a similar table that came in new with tacky protectant and we have struggled with ever since. I am dying to repaint it and make it look better other than its orangey look wood. To achieve the look of the first table ( Annie Sloan’s Chateau Grey as the base and I used Minwax Dark Walnut for the stain) you suggest sanding, painting, then using Minwax Dark walnut and then you mentioned a clear wax, which brand did you use on this first table on this post? And did you use any wipe on poly. I’m sorry for all the questions but i kind of got lost on which treatment went on which table as they both look a bit similar. Again im interested on the steps for the first table on this post. Thank you so much for your help in clarifying this for me.
Hi Maggie I sent you an email to help answer your question better. ~ Lori
Hi Lori – could you also send me the same e-mail with the detailed instructions? I love the look of the first table – you have awesome talent!!
I will Kerry!! Look for it for sure by Monday. My in-laws are coming into town today.
Hi Lori – was just wondering when you might have a chance to send me that info? It sounds like you’ve been super busy, so just let me know if you can’t. Thanks, Kerry : )
Hi Lori,
I have the same question as Maggie (1/23/13). I’m interested in how you achieved the look on the first table. I have an unfinished mantle, and this vintage look is exactly what I’m looking for. Could you send me the step by step instructions as well? I need some clarification on the waxing steps. Do you think I can achieve this look on unfinished wood?
Thank you!
Hi Diana, I wrote out a new post. Hopefully answering all of your questions. I do think you can achieve this look with unfinished wood. There might be a few added steps depending on the amount of distressing you are desiring. You can stain the wood first to have that dark wood look, use a new product called glacage- that is the color of wood and a texture medium, or even use a dark brown paint to mimic that look. The new post is https://vintagecharmrestored.com/?p=1327 Thank you!!
Hi Lori,
I realize this an older post of yours but could you send me the step by step email for the first table your did also.
I love it. thank you
Hi Lori, Awesome post and explanation about the differences in waxes!! You explained it so well, which will help me better explain to my customers about how awesome the Maison Blanches waxes are!! Have an awesome day!!! Tina
What color paint is on the table and chairs….graphite? Or another type of black? I will be doing the same to a hand me down table for our home once we move back – first floor was demo’d in Sandy. Thanks!
Barbara on the darker table it was Benjamin Moore’s Space Black. Today I would use our Wrought Iron from Maison Blanche paint but it was before it came it out!! It’s a true black. ~ Lori
[…] answered here for you!! I get soooo many questions and requests and “please help me create that look in that table oh please!!” emails that I can’t answer you fast enough or detailed enough. If I […]
What type of wax is it OK to you wipe on poly with? I have La Maison chalk paint and wax. Also what brand wipe on poly do you use? Is it water based?
Thanks!
LK
I have a buffet or sideboard which has been done in chalk paint and is waxed. I want to darken it some or do something like the staining. Can you give me some suggestions? Also, can you use the stain on top of the wax?
Omg…I’ve been stuck…for weeks with an awesome dresser. But it has a green factory stain, that I can not get rid of on the top. This should do the trick!! I’ll def try the wax you suggest too. Thank you so much for sharing.
Love the red dresser of yours! I never heard of a stain called Le Craie Chocolat,. Who makes it? Also, love the red color! 🙂 Could you please tell me what color red that is? Love all of your work!!! 🙂
Just a quick question. I am trying to get this look. I painted my black table with the ASCP coco. I am trying to decide on a stain color while it is drying. I practiced on another piece of furniture and cant seem to get the stain to keep lines in it. Does that make since? It just wants to spread out. Does that mean I have to much stain on my brush?
Thank you so much for posting this! I stumbled across this page while trying to find an answer to a problem I created today; hopefully you can help! I have a newer piece of furniture that is solid oak, with some type of coating or finish on it. I have painted the entire piece using chalk paint, sanded in the places I’d like distressed, and then went over the whole thing with Minwax dark stain, immediately wiping off as I went. Now, I’m loving the color I’ve ended up with, but it is extremely streaky and you can see tons of brush marks from the stain. I used a foam brush to apply. Any advice would be so appreciated! Thank you!
Hi, this post is pretty dated so I really hope you get it. I’m in the middle of a project, trying to get this same look. I have run into a problem. I already painted and stained and it looked amazing. I loved it. Started to wax and now its messed up.
I tried to recreate your table and painted my chairs with coco and applied the Jacobean stain on top and it’s not drying.. It’s been several days , what did I do wrong ?
It could be heat and humidity this time of year. Or that the application was applied to thick.
I did this on the exact same light maple table and love the result! I had sanded and stained first, but it did not take the stain evenly at all. I was so glad to see your post! So I used Rustoleum’s White Linen Chalky paint, followed by a dark stain I had on hand, Espresso. I ended up staining twice and making some touch ups a third time. It is fantastic! I went to wash a corner before applying the poly and ended up washing off the stain (whoopsie) but fixed it easy enough. If you email me I can send you some photos. Thanks again for the great idea, you saved my kitchen table and made it way cooler than before 🙂
Clair
Edmonton, Canada
[…] So, I decided to just strip and stain the table top and paint the legs and chairs – sort of like what you see here. […]
Hi there
Could you tell me what you painted the legs and chairs on the table 3 photos down? I love it! It says Annie Sloan Coco but it looks way darker. I’m looking for something dark brown black for a coffe table legs and this looks perfect.
Thanks
Did you use an oil based stain or water based stain?
I used water with no protectant built in… straight stain. That is the most important thing. Most of the stains now (however many years later) all have polyacrylic in them. This WILL NOT work trying to use wax to get the look.
I love your pieces! I have a ton of AS paint, so don’t want to go buy more before I use this up. Can I use the Le Craie wax over the AS paint?
Thanks!
Karen
Yes of course you can!! Enjoy!!